DIY No Sew Indian Costume- Part 2

IMG_0389-0

Better late than never, right?! I started this two part post back in November around Thanksgiving and well…things got crazy and I actually forgot that I never finished it. Until…this morning. So here we go!

This costume was relatively easy, I promise. My oldest had a Thanksgiving day feast in November and the classroom was divided into Pilgrims and Indians. My girl needed an Indian costume quick!

I really didn’t want to buy yet another costume and I had this giant bag of beads leftover from a previous project. I had to make it work somehow. So off to Pinterest I went. This post from Playdates & Pearls caught my eye and it gave me the inspiration to go ahead confidently and make one.

In my last post, I showed how I dyed, washed and dried the shirt.

After the shirt dried, I cut the long sleeves off to make a short sleeve shirt. I purposely bought long sleeves because I will use the cut parts for the costume.

12507653_10206034111267991_7720490024999899562_n

12541129_10206034111748003_6611310935351445961_n

Then I cut the bottom hem of the shirt completely off and saved it to use later as well.

12573113_10206034111788004_4509189621241572721_n

12522942_10206034111027985_8538997005429457304_n

I cut fringes all around both short sleeves. They were about 1/2 inch wide and 3 inches long. I needed to make sure there was enough room for beads and to tie a knot after the fringe was beaded.

12508697_10206034110987984_6313587780250189446_n

Then I cut the same size fringes all along the bottom of the shirt.

12524292_10206034110227965_8480005924693061331_n

I had the girls help do all the bead work. Some of the fringes were a little thick. I had to snip the end to form a point so the girls were able to bead it. My 3 year old probably did about 4 beads total and then she was done. She was more interested in goofing off with her little sister. My 5 year old LOVED beading! She’s very detailed oriented and has great dexterity…future dental hygienist?? 😉

I cut the long sleeves so that I had about 4-5 inches of fabric past the cuff. I was originally thinking that my daughter could wear these on her wrists but then thought it would look cuter (and stay on longer) if she wore them on her legs. Thank you for the idea, Samantha!

12508697_10206034110467971_8407456950886068452_n

940923_10206034110587974_428149386287734057_n

And here’s the final picture! I used the bottom hem that I cut off to tie around my daughter’s waist as a belt. We also made a headband out of the foam and stapled the feathers on the back which she actually wore all day at school! The necklace was her idea and she thought it would look “fashionable” if a feather was added.

I did all the fabric dyeing and cutting and she did all the beading. I had to tie the knots for her after the beads were on. This an inexpensive and relatively easy craft to do WITH your child for Halloween, a school party or just for some good old fashioned fun!

I hope you enjoyed my project with my girl! Now go get crafty with your kids and make sure to send me a picture so I can see what you’re up to!

12523073_10206034109907957_440257499468865586_n


And here’s the breakdown of the cost for this costume:12573935_10206034111547998_8594811136944350054_n

DIY No Sew Kids Indian Costume

My kindergartener is having a Thanksgiving Day Feast with the 1st and 2nd graders next week and they can come dressed up as either an Indian or a Pilgrim. My girl wants to be an Indian but I’m not allowed to braid her hair. WHAT?!?! I’m going to have to work on that one…

I searched Pinterest and found what appears to be an ‘easy’ no sew do-it-yourself indian dress. I pinned it and headed out to the stores. Well, truth be told…I headed to my husband’s closet first to see if I could steal an old brown t-shirt or two. No such luck. **Note to self…buy him a variety of colored shirts, not just orange and blue 😉

I headed to Hobby Lobby first and they had a great selection of long sleeve t-shirts at a great price…and they were on sale too! Score! But…they didn’t have brown. And I really, really wanted brown. Ok, no biggie. I’ll just dye the shirts. Easy peasy. But…they didn’t have brown dye. They were all out. Ok, no biggie. I’ll stop at Michael’s on my way home.

IMG_0389-0

While at Hobby Lobby, I picked up two (I only need one costume but I have a feeling my 3 year old will want one) long sleeved, size small adult t-shirts, 2 packs of feathers, and 1 piece of brown foam board (maybe to help in making a headband??). I already had beads at home left over from another project. So off to Michael’s for some brown dye…I was also hoping they had brown shirts so I could save a step but they didn’t.

They had brown dye and I was able to use a 50% off coupon so it came to $2.13! Score! Now…let’s change the color of these shirts because I promised the big kids they could help put beads on when they got home from school.

IMG_0390-0

I took a bucket from the garage (thank goodness it’s black), rinsed it out and filled it with HOT water. I dumped the liquid dye in and mixed for about 2 minutes before I put the wet shirts in the bucket. The directions say to add 1 cup of salt but I didn’t. I’m not looking for a perfectly brown shirt. I just need it not to be white and to be kind of brown.

Now, the directions say to mix CONSTANTLY for 30-60 minutes. Umm…who the heck has time for that?! And I’m pretty sure my arm would fall off in the process. So I left it and mixed it maybe every 5 minutes for about 30 minutes.

IMG_0391-0

After thirty minutes, I very carefully emptied the bucket and started to rinse the shirts with cool water. Talk about a mess! Thank goodness the big kids were at school and the baby was sleeping because this was hard enough to do by myself let alone have my little helpers helping me.

This is what the shirt looked like after I rinsed it with cool water. I tried my best to keep rinsing until the water was clear but I probably could have done a little bit better. Next up, I threw them in the washer and dryer!

IMG_0392-0

This is how it looked after the washer…

IMG_0394-0

And this is how it looked after the dryer…

IMG_0396

Definitely a bit blotchy but it will be perfect for an indian costume! Next up, time for the scissors and some beads!

Stayed tuned…

{insert Jeopardy music here}

For Part 2, click here!

Painting Is Easy. Choosing a Color Is Not.

paintingiseasy

The day we walked into this house, I knew I wanted to paint the kitchen. It took me months to finally decide on a color. Some days I wanted to stick my head in the sand and hope and wish someone else would do it for me. No such luck. My husband is a smart man. He would NEVER pick a color and paint without my approval. He would hear about that (and not in a good way) for the rest of his life. #happywifehappylife 😉

I had to think of the house as a whole. I like for the rooms to blend or compliment each other. I wanted a bold color but also one that would blend. Talk about a challenge…for me. I’m not good with that kind of stuff. Give me a recipe book and I can cook for days. Give my an empty room and tell me to decorate it…insert head in sand! Or better yet, I may just run away!

Here’s what I knew…I knew what I liked. I knew what kind of bar stools and kitchen table we were getting. I also knew that I’m always drawn to the beach and all of those beautiful shells! Now, how to bring it all together and have it look nice.

theme

Like I wrote in my last post about painting the kitchen, I googled & pinned for days. After much ‘research’, I finally decided on a blue, a nice navy blue. Great! The hard part is done, right? WRONG! Try going to the paint store and picking out a nice navy blue. Ugh…

3blues

I narrowed it down to ‘Inked’ and ‘Very Navy’ but ‘Very Navy’ scared me. It was really dark!

paintsamples

These swatches stayed taped to the wall for a few days but I’m sure if you ask my husband he would say a few weeks. One morning over coffee, I took the plunge and chose ‘Inked’. That’s it. It’s only paint. If I don’t like it, I’ll just repaint it a neutral tan color and be done with it. Gotta keep moving forward…

In the process of choosing the color, I did start painting over some of the painted on brick. And of course, every session of nighttime painting begins with a glass (or two) of my favorite red wine!

wine

Before…

barbefore

And the after….

barafter

Woohoooo!! Brick be gone! Now, let’s get going with that blue!

bicep

#icrackmyselfup

Stay tuned…

Change the look of your kitchen with just a little paint!

It’s no exaggeration to say that I spend ALOT of time in my kitchen. I’m a stay at home mom with 3 kids, 4 if you count the husband, and they require to be fed on a routine basis….like every 10minutes, no lie!

When we were house hunting, finding the perfect house with the perfect kitchen was a bit on the impossible side. I almost nixed the idea of putting an offer on the house we are currently living in because I HATED the kitchen. I hated everything about it…

the old cabinets

12068793_10205478251211837_740312369532450690_o

the white appliances

12080115_10205478250731825_45452712721341590_o

the cream color formica counter tops

12087866_10205478248891779_7030794072462890708_o

the light colored tile, the red paint, the gold sponge paint on top of the red paint and the painted on faux brick on top of the red paint.

12140113_10205478249651798_2512257362568208035_o

Don’t get me wrong, I LOVE the color red. I really do. But it was too much for the kitchen. It wasn’t my style and it made me not want to be in the kitchen.

I firmly believe that the most memorable family memories are made in the kitchen. Any conversation or story that I tell my kids from my childhood, always has us in the kitchen. So I was determined to turn this kitchen around.

I pinned, I googled and I browsed Home Depot. I knew what I wanted but I couldn’t get the husband (or the checkbook) to go for it, no matter how hard I tried. Deep down, I knew it was unrealistic to redo the entire kitchen so I opted to work with what I had. I still pinned and googled but this time I added a few key terms to help with my search…oak cabinets, white formica, white appliances. I wanted the internet to show me what color paint would work best with what I had because I knew I could get the husband on board with that and he would love it too! I could change the look without draining the bank account. I was determined to LOVE my kitchen again and a little paint could bring me that love…right??

Stayed tuned for Part II…

I Should Have Saved The Template…

Right before my oldest was born, we bought a wall photo collage to hang in the hallway. It was beautiful! But it sat on the floor in the boxes for months collecting dust. It was a project I thought I could do while I was on maternity leave. Ha! Talk about being a naive first time mom. I remember thinking…”I’m going to need to do something since I won’t be working.” Hahahaha. OMG. I’m laughing now as I type this. I won’t let this post go there though. That needs a post all on its own!

My father and step mother came down from New Jersey to meet their newest granddaughter (grandbaby #3- they now have 10 and the oldest is only 6!). While they were here my step mother insisted that my dad hang the pictures for us. I have to be honest, I don’t really think he wanted to. I’m thinking he didn’t want to drill holes in another man’s walls. But I proudly dusted off this template that I bought with all the frames. All you needed to do was pick the design you liked, tape it to the wall, make sure it was level and then drill on all the X’s. Now hang the pictures and VOILA! Easy peasy!

Well, at that time I never in a million years thought we would MOVE! So…I threw it out the template once we were done. Four and a half years later…we moved. Yep. And we LOVED our wall collage. I was determined to get it on the wall in our new house, our forever home. Come to find out, the template is no longer available. WHAT?!? You’ve got to be kidding me. I know I can find it somewhere. Michaels.com. Google. Amazon. Nope. Nope. Nope. No where to be found.

{insert many, many, many curse words here}

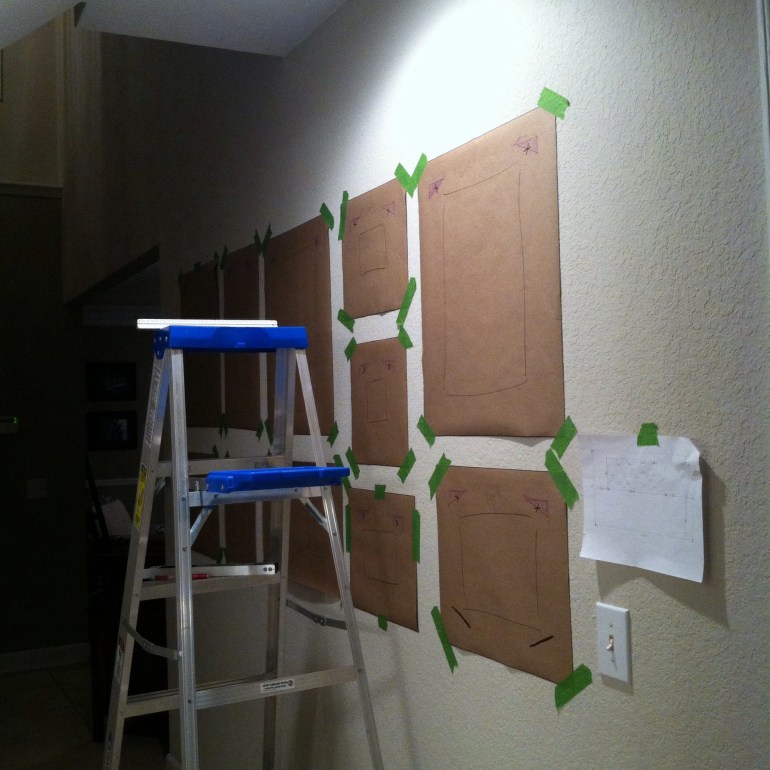
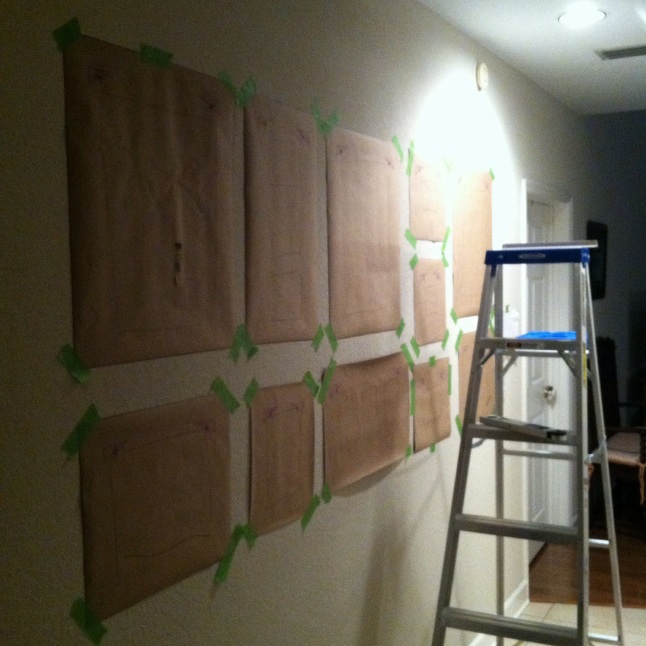
Like I said, I was determined to hang this in the new house so I had to find a way to create my own template. I picked up a roll of brown paper from the Home Depot (the girls and I made it a #CampRoemer adventure!) and traced each frame with a sharpie on the paper. I then cut each one out, as accurately as I could and after, I flipped the frame over, placed the cut paper on top and rubbed a crayon on the nifty, little hangers on the frame. This way after I taped them on the wall, I would know where to drill the holes.

20150718-214416.jpg

Not only did I have to create a new template, I had to add another 16×20 frame so that each child would have their own. That got a little tricky.

20150718-214310.jpg

I sketched it out the best I could, trying not to let my perfectionism take over but getting very close.

20150718-214508.jpg


I used painters tape to tape the brown paper to the wall. I have to be honest, this part was awful. I was running out of patience and it was getting late…so sorry for the dark pictures. This was a project I could NOT do with the kids awake. I was measuring and leveling and drinking wine…not a good mix. Ha!

The next morning, I rechecked my measurements and my leveling and gave the go ahead to the husband to start drilling!

20150718-214439.jpg

20150718-214235.jpg

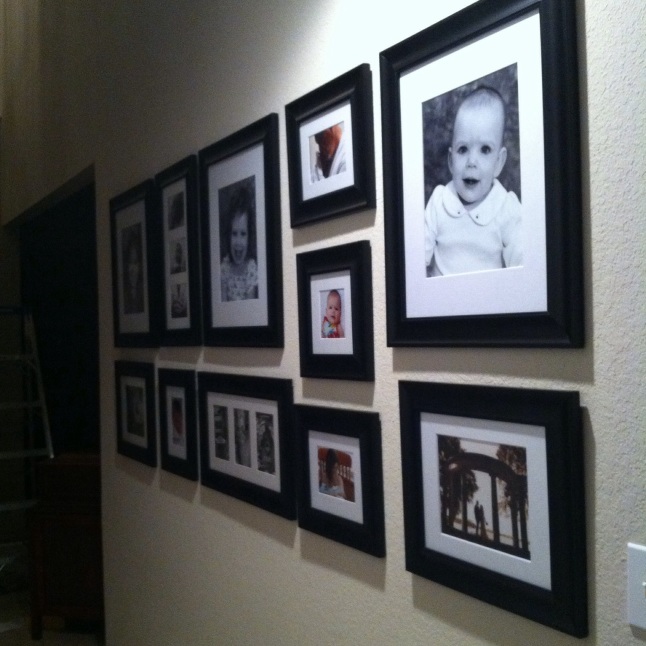
We excitedly hung all the pictures and then I remembered…I needed to get 2 more frames! One broke during the move and one was an addition. Oops! Off to Michael’s! And what perfect timing we had! The frames were BOGO! Woohooo!

20150718-214158.jpg

The B&W pictures of the girls are from February so they will stay but I’ve got to pick out some new ones and replace the original photos in all the other frames. That may take a while! Ha! I’ll be sure to post a new picture once I have all the new photos in and I promise to take a picture in the day time. It didn’t come out ‘perfect’ but it looks great and warms my heart to see my babies!

Do you have any tricks when hanging multiple pictures?? I would love to hear them because I still have a bunch on pictures, frames and art to hang up.

Katie

xoxo


Crafty Kids & A Frugal Mom

20150301-141100.jpg

It’s no secret that I have passed on my love for crafting to my girls. The ask me every day if we can do some sort of craft whether it’s painting, cutting, coloring or glueing. They love it all!

Now that the two older girls have quite a list of friends, there is always a birthday we are celebrating. I got tired of buying birthday cards….actually that’s not true. I got tired of FORGETTING to buy the birthday card.  #mombrain I have a closet full of craft supplies and those times that I didn’t have a card, I would quickly make one on our way out the door. Then the light bulb went off…why not have the kids make them!! So we starting making cards for all occasions- Christmas, Thank You, Birthday, Mother’s Day, Father’s Day and this time Valentine’s Day. Valentine’s Day was fast approaching and I still didn’t get cards for the girls to handout at their parties. I was looking through our town’s newsletter and VOILA! There was a link to the cutest homemade valentine ever- a butterfly with a lollipop for the head and body. All you had to do was print, cut, decorate and stick a dum dum pop inside through the middle. Perfect! Or so I thought… 20150301-141031.jpg My printer was on the fritz (and still is…ugh) and I already told my oldest we were going to make them. You know those 4 year olds…they never forget a thing! So what’s a mom to do? Cut out the butterfly from the newsletter, trace them on card stock and cut out 40 of them (20 for each class). OMG. I was really wish I had a Cricut for that one!!

But it was totally worth it. The girls had a great time coloring and decorating all the butterflies. Even the 2year loved it! It kept them happy and content for at least an hour and a half. No whining, no complaining and no fighting! Score one for mom!

Next time, if we have to do that many, I have to start more than a few days early. We cut it pretty close this year. The 2 year old had all 20 of hers done in about 30 seconds but the 4 year old was really into decorating each one ever so carefully.

Check out the butterfly cards over at Skip To My Lou. They could be used for any occasion, not just Valentine’s Day and who doesn’t love artwork from kids with a bonus lollipop?! There are a bunch of great FREE printables and activities for the kids. If you stop by, tell Cindy I said hi! 🙂

Happy Crafting! Katie

P.S. Come visit me over on Facebook… Mrs. Roemer’s Nest 🙂

Crafty Kid Time

Sunday’s card making went so well, I stopped at Michael’s again and picked up some more supplies. I’m in the process of making some teacher gifts (another blog post to follow) and I needed some cards to go with the gifts. My 4yr old LOVES to craft and she is in LOVE with Baby Jesus (she thinks she will get to meet the “real” Baby Jesus on Christmas) so I thought this would be a perfect craft for her. I waited until the other girls went down for their nap and I let her do this one alone. She let me help every once in a while, but for the most part she did it all.

photo 3-2

Now these were slighter more expensive to make…$0.32 per card compared to $0.30 per card for the Christmas tree one. Hahaha! Again, it would cost more to mail these cards than it is to make them. LOVE IT!!

Here’s the breakdown…

  • cards with envelopes…$2.49
  • nativity scene foam stickers…$1.99

For a grand total of $4.48. The stickers only had a complete set of 7, so we decided to do two different cards to be able to get 14 cards. It took a bit to convince her that it would be ok if the wise men are on their own card. I told her they will follow the bright star of Bethlehem and find Baby Jesus. She gave that some serious thought and then gave me the nod of approval. Have I mentioned that I just love this age?

I now have a total of 39 Christmas cards and I only spent about $12. The kids had a blast creating cards to give out to friends and family and hopefully I’ve created some good family memories for them.

Love & Prayers,

Katie